


If you’ve been searching for a game-changing skincare tool to elevate your routine, the ultrasonic facial cleanser might just be your new favorite device. Offering deep pore cleansing, gentle exfoliation, and enhanced product absorption, this sleek little gadget has become a staple for skincare lovers who want that post-facial glow—without the spa appointment. But to get the most out of it, it’s important to know how to use it correctly.
In this guide, we’ll walk you through everything you need to know about using an ultrasonic facial cleanser at home like a pro.
What Is an Ultrasonic Facial Cleanser?
An ultrasonic facial cleanser is a handheld skincare device that uses high-frequency sound waves—typically around 24,000 to 30,000 Hz—to deeply cleanse the skin. These rapid vibrations create a gentle pressure that helps dislodge dirt, oil, dead skin cells, and blackheads from your pores. Many devices also come with a metal spatula tip that lightly scrapes the skin’s surface to aid in removing impurities and boosting circulation.
Some models include additional features like lifting, iontophoresis (to help absorb serums), or massage settings to give your skin a complete treatment experience.
Benefits of Using an Ultrasonic Facial Cleanser
Before we jump into how to use it, let’s look at why you should consider adding one to your skincare arsenal:
- Deep pore cleansing: Removes dirt, oil, and impurities trapped in pores.
- Exfoliation: Gets rid of dead skin cells without harsh scrubs.
- Improved product absorption: Helps serums and moisturizers penetrate deeper.
- Stimulated circulation: Promotes a healthy, glowing complexion.
- Gentle on skin: Ideal for people with sensitive or acne-prone skin who can’t use abrasive exfoliants.
Step-by-Step Guide: How to Use an Ultrasonic Facial Cleanser
Step 1: Start With a Clean Face
Always begin with a fresh, makeup-free face. Use a gentle cleanser to remove any dirt or oil. Rinse thoroughly and pat your skin dry, but keep it slightly damp—moist skin conducts ultrasonic waves more effectively.
Step 2: Steam Your Face (Optional)
To replicate a professional facial and open your pores, steam your face for 5–10 minutes. You can use a facial steamer or a warm towel. This softens blackheads and makes it easier for the device to extract impurities.
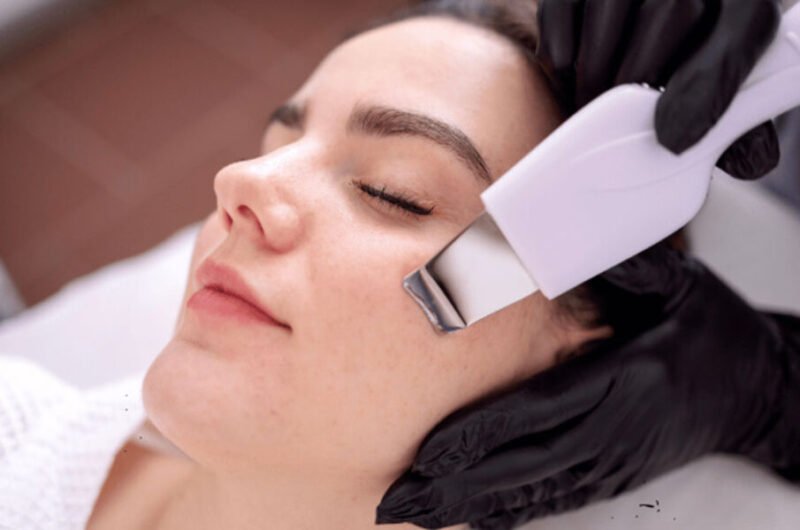
Step 3: Turn On the Cleansing Mode
Power on your ultrasonic facial cleanser and select the cleansing or peeling mode, depending on your device. Hold the spatula tip at a 30–45-degree angle against your skin, with the curved side facing down.
Gently glide the device over your face, focusing on problem areas like the T-zone, chin, and around the nose. Use slow, upward strokes. You’ll likely see a thin film of residue on the spatula—this is a mix of oil, sebum, and dead skin.
Tip: Don’t press too hard. Let the vibrations do the work. Gentle pressure is all you need.
Step 4: Wipe and Repeat
After every few strokes, wipe the metal tip with a cotton pad or tissue to remove debris. Continue until you’ve treated your entire face, usually for about 5–10 minutes.
Step 5: Use the Lifting or Absorption Mode
Once your skin is thoroughly cleansed, switch to a mode that helps with product penetration (often labeled as “moisturizing,” “ion+”, or “lifting”).
Apply your favorite serum or moisturizer, then use the flat side of the spatula to massage the product into your skin using upward, sweeping motions. This enhances absorption and improves skin elasticity over time.
Step 6: Finish With Moisturizer and Sunscreen
Seal in all that hydration with a good moisturizer. If it’s daytime, be sure to apply sunscreen. After ultrasonic exfoliation, your skin can be more sensitive to UV exposure.
How Often Should You Use It?
For most skin types, using an ultrasonic facial cleanser 2 to 3 times per week is ideal. If you have sensitive skin, start once a week and gradually increase. Overuse can lead to irritation or dryness, so give your skin time to recover between sessions.
Important Do’s and Don’ts
Do:
- Use on damp skin for better conductivity.
- Clean the spatula with alcohol before and after use.
- Use upward strokes to promote lifting.
- Follow with hydrating products and sunscreen.
Don’t:
- Use on broken or inflamed skin.
- Press down hard—you can damage your skin.
- Skip your regular skincare routine after use.
Pro Tips for Best Results
- Store your device in a clean, dry place to prevent bacterial buildup.
- Don’t rush the process. Take your time for each area.
- Pair the device with products that contain active ingredients like hyaluronic acid, niacinamide, or peptides for extra benefits.
Final Thoughts
An ultrasonic facial cleanser isn’t just another gadget—it’s a smart addition to a modern skincare lifestyle. By incorporating this tool into your weekly routine, you’re not only taking better care of your skin but also embracing a more mindful, results-driven approach to self-care. The ability to achieve clearer pores, smoother texture, and a radiant glow at home makes it a powerful ally in maintaining healthy skin.
And let’s be honest—building a skincare ritual that fits your lifestyle, whether you’re a busy professional, a stay-at-home parent, or someone always on the go, is the ultimate form of self-investment. With consistency, proper technique, and the right skincare products, this device can help you look and feel your best—day after day.
So go ahead, elevate your skincare and your lifestyle. You don’t need a spa to glow like a pro—you just need the right tools and a little know-how.